on
Post 4 - The Technology Stack: Amazon Web Services Products
Ths is the fourth post in a series about the deployment of GeoBlacklight at NYU. It was originally published in January, 2016. For an outline to the series, click here.
GeoBlacklight itself is simple to deploy, and there are several richly-documented resources on how to do this with Packer, Vagrant, Docker, and other virtual machine tools. However, the dependencies and entire technology stack behind our Spatial Data Infrastructure is a bit complex, so we hope that insight on specs and installations can help others in their development process. Note that neither the specific cloud-based services nor the way these software platforms relate to each other are necessarily intrinsic to GeoBlacklight. There are many other ways to deploy these tools.
![]()
Our most important initial decision was to use a cloud computing provider to host the majority of components comprising our geospatial data infrastructure. We ended up using Amazon Web Services, but many viable competitors to AWS exist as well. Early on, AWS allowed us to prototype and stand up core elements of the stack to develop a good proof of concept, and using cloud infrastructure provided us with the invaluable opportunity to test interconnections between GeoBlacklight and the various other components of the stack. With AWS, it is simple to spin up temporary servers for purposes of testing. It has proven to be very straightforward to scale up directly from our initial prototype.
At NYU, it became apparent that AWS could be a solution for running spatial data services in production, not just development. So far, we have been able to maintain a high-functioning service at a very reasonable cost, and because we had already had success in our university and within our team with AWS products, we were able to get institutional buy-in quickly.
Outlining the Pieces
First, let’s begin with our spatial data infrastructure as it currently stands.
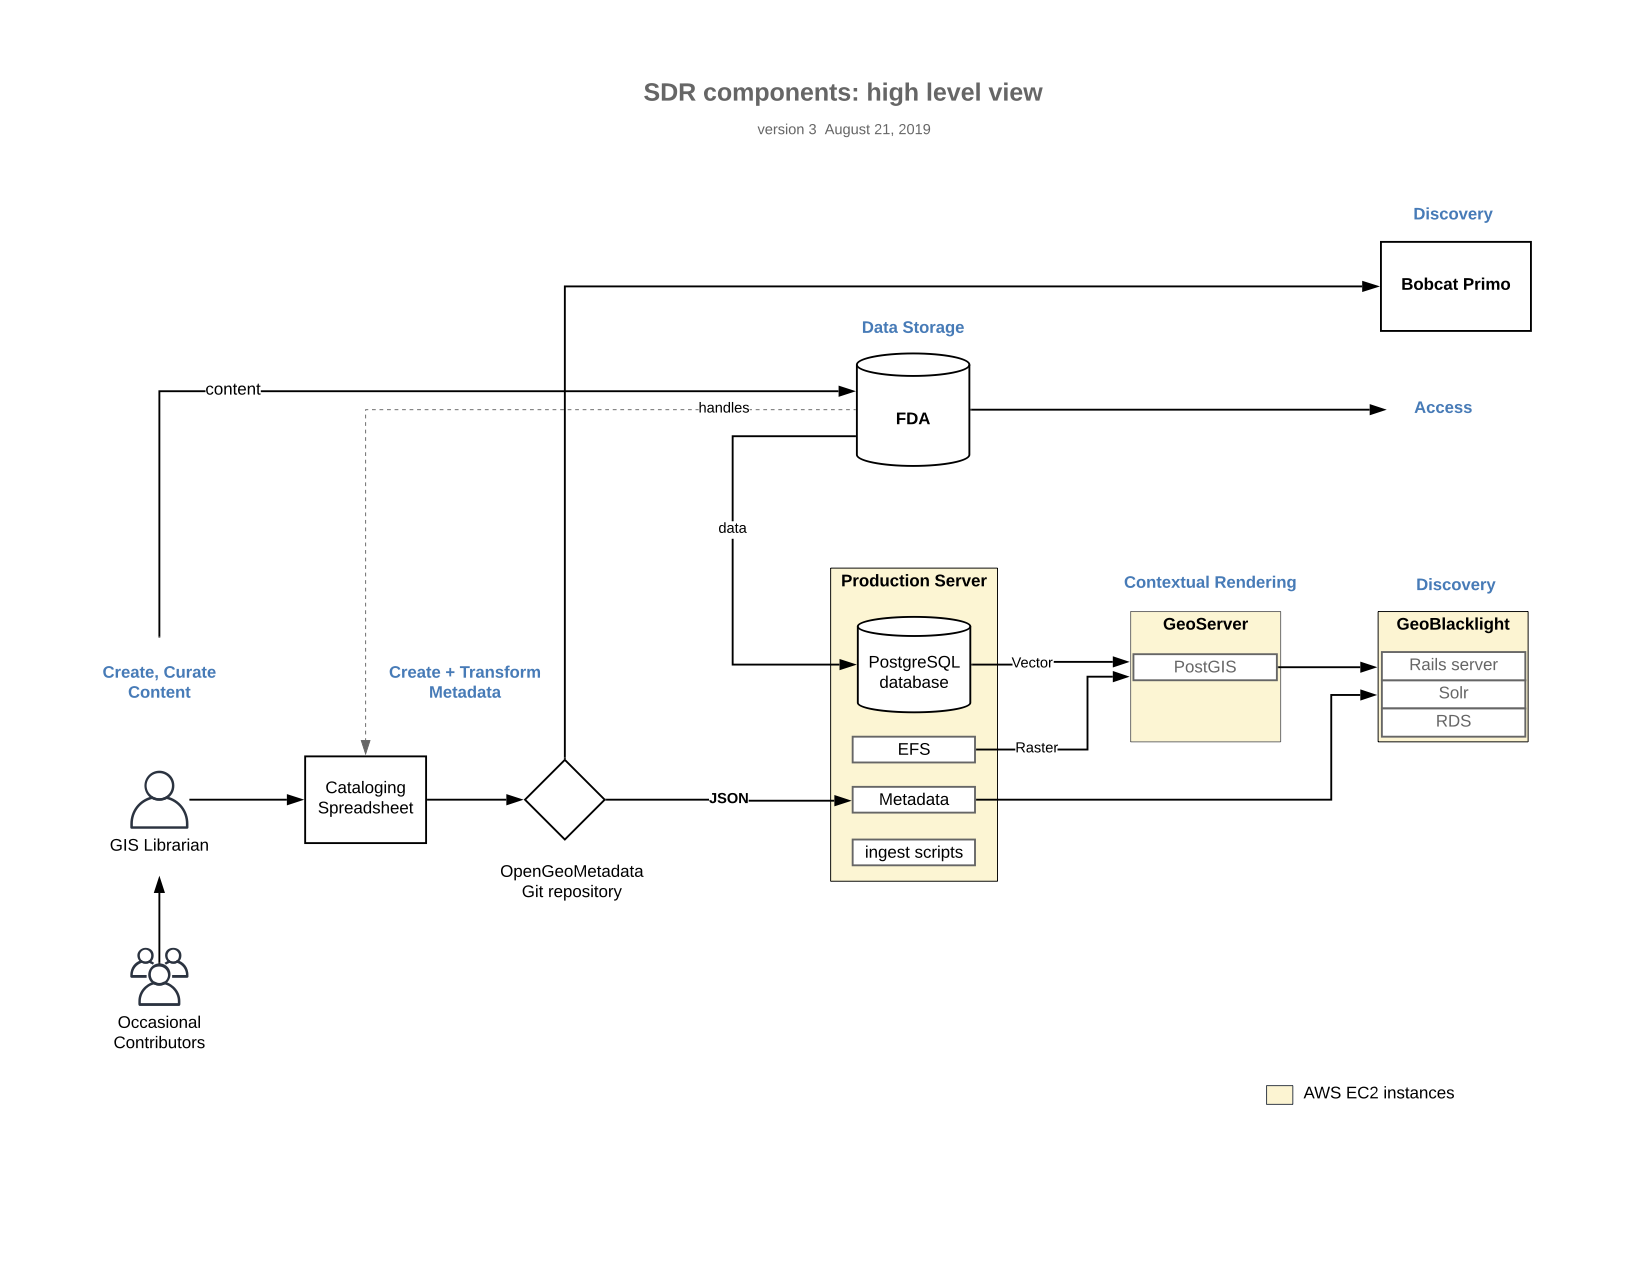 An overview of the collection architecture. Diagram by Deborah Verhoff, August 21, 2019
What started as a series of drawings on a chalkboard ended up as this mostly-correct diagram of our deployment of our Spatial Data Repository. To explain how we stood up these various pieces, we created a table that indexes these parts as they pertain to our collection and service flow. In-depth glosses are below the table.
| SDR Component | Description | Documentation | AWS Product Used | NYU Deployment |
|---|---|---|---|---|
| PostGIS Database | Holds reprojected vector data | Available here | RDS | unavailable |
| Solr | Search index for searches | Available here | EC2 | unavailable |
| MySQL | Background database for Blacklight | Available here | RDS | unavailable |
| DSpace | Institutional preservation repository | General documentation | N/A - on NYU Libraries servers | unavailable |
| GeoServer | Produces WMS/WFS endpoints & layer previews | General documentation | EC2 | https://maps-public.geo.nyu.edu |
| GeoBlacklight | Ruby on Rails discovery environment | Available here | EC2 | https://geo.nyu.edu |
PostGIS Database
Our PostGIS database runs on Amazon’s managed relational database service (RDS). PostGIS extensions should be added to a default PostgreSQL database by following these instructions. While configuring your database, make sure to create read-only user accounts for GeoServer to use while retrieving vector geometries. At the current moment, we are using PostGIS only for vector data, though it would be possible to store rasters within it as well; we have opted to keep raster data as GeoTIFFs.
One PostGIS database contains all vector layers, regardless of whether they are Public or Restricted (that distinction only becomes consequential at the GeoServer level for us). We use Amazon’s security groups to restrict traffic to and from this database, for additional protection. Traffic from outside the Virtual Private Cloud may be limited to NYU IP ranges (or another institutional IP range) if there is a desire to allow direct connections. Otherwise, when establishing the PostGIS database, access should be completely restricted to the GeoServer instance(s), as well as a management server.
We have also experimented with directly connecting to PostGIS from a desktop GIS client (like QGIS). While this is possible, we have gotten better results by making a desktop connection via GeoServer’s WFS.
MySQL (database for Blacklight)
We have chosen to use MySQL as the backend database for Blacklight. A database is required for user data, including bookmarks, etc. within the application. If replicating this, make sure to add gem ‘mysql2’ to your Gemfile, and adjust the appropriate database parameters. Our instance of MySQL also runs on Amazon RDS, and it contains two databases (one for production and one for development).
Solr
Solr is the “blazing fast” search engine that powers GeoBlacklight. Since Solr has no user-access restriction measures by default, access to it is highly restricted in our deployment (and we recommend following suit). GeoBlacklight communicates with it directly via the RSolr client. At no time is a user connecting directly to a Solr core via their browser; the queries always go through Blacklight, which handles the Solr connection. Solr is deployed on an EC2 instance, and is fire-walled such that it is only able to communicate with the Rails server and a deployment server that has been designated for handling metadata ingest. We are maintaining production, staging, and development Solr cores, so that we can preview new records before publishing them to the production instance. This is a good strategy for catching errors in metadata records or seeing the effects of large-scale changes in metadata.
Geoserver(s)
Geoserver is an open-source server for sharing geospatial data, and GeoServer provides two crucial services for us: the WMS and WFS endpoints that GeoBlacklight needs for layer previews and generated layer downloads respectively. We have two instances of GeoServer up, at:
- https://maps-public.geo.nyu.edu
- https://maps-restricted.geo.nyu.edu
Both connect directly to the PostGIS database, though the layers enabled by each (and therefore being served) are mutually exclusive, and dependent on the Rights status in the metadata for the records. Layers are enabled and disabled by a Ruby script that runs through GeoBlacklight-schema JSON records, and then connects to the GeoServer REST API. We have separate instances of GeoServer for Public and Restricted data so that we can limit access to the Restricted endpoint to NYU IP address ranges. For users trying to access Restricted data from off-campus, OCLC EZproxy is used to establish a proxy after users authenticate with NYU Single Sign-on.
GeoBlacklight
The SDR currently relies on GeoBlacklight to provide a discovery interface. Our local code modifications to GeoBlacklight core are logged on the production code instance here. GeoBlacklight is a Ruby on Rails application, and we have deployed it on an Ubuntu 14.04 server, hosted on an Amazon Web Services EC2 instance. Phusion Passenger, via Apache, is the Rails web server. HTTPS is forced (this is a requirement of the OmniAuth integration). Here is a helpful set of instructions on how to implement Passenger with Apache on Ubuntu 14.04 (albeit from a different cloud provider).
Connecting with SSO
As is the case for many institutions providing access to geospatial data, there are specific license restrictions to much of the data in our collection. The easiest way to mediate access to these protected layers is to set up two instances of GeoServer and gate our restricted instance with NYU’s Single Sign-on service. GeoBlacklight also needs to be aware of user accounts from an institution’s greater SSO environment. Since GeoBlacklight is already built around user models from Devise, we were able to connect to NYU SSO by using an OmniAuth strategy for Devise.
Final Words
We are happy to answer any specific question about the deployment of these platforms. Also note that as elements of NYU Libraries production practices change, several minor changes may be made.